
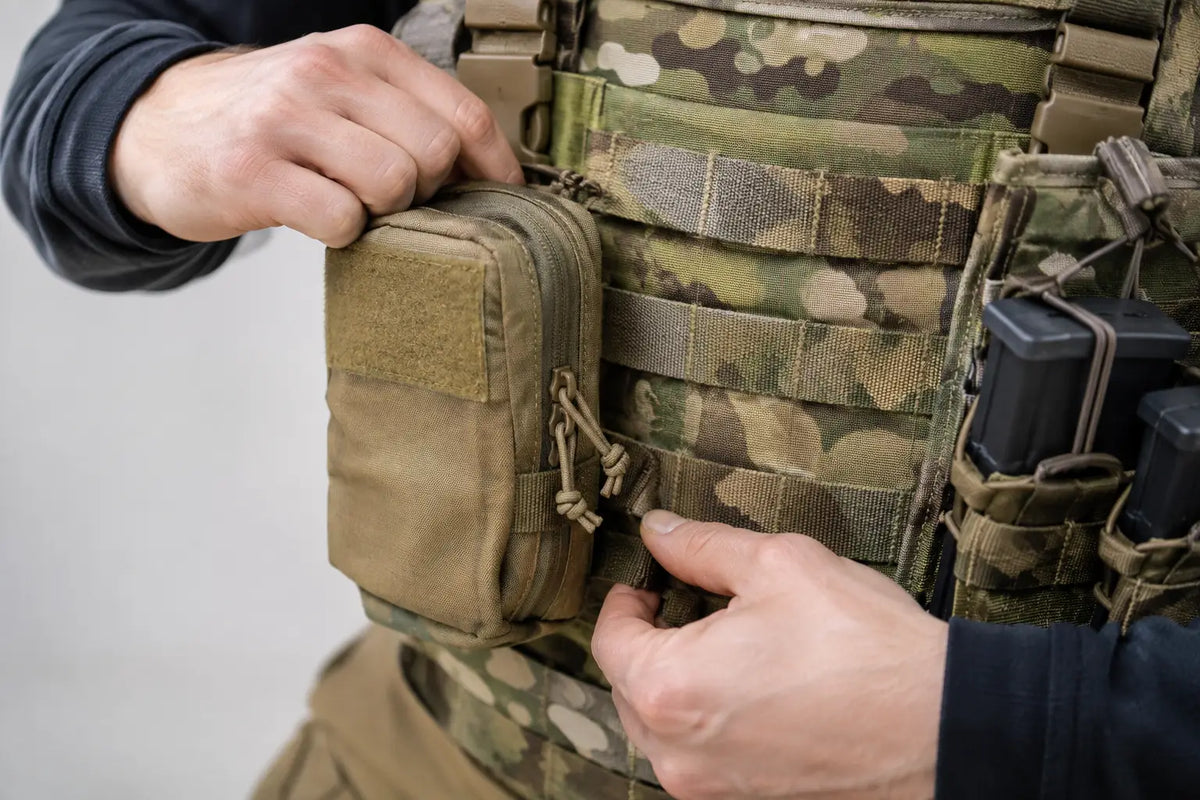
A pouch that swings, sags or catches on brush is more than an irritation. It wastes space, slows access to essential kit and can work loose when you are moving hard. Knowing how to attach MOLLE pouches properly gives your belt, plate carrier, daysack or webbing a secure, low-profile layout that stays put.
MOLLE stands for Modular Lightweight Load-carrying Equipment. The principle is straightforward: webbing rows on the host platform lock together with webbing straps on the pouch. The strength comes from weaving those straps through both sets of webbing, rather than simply clipping the pouch on at the top.
Check the pouch and platform before fitting
Start by checking that both items use compatible MOLLE or PALS webbing. PALS is the grid of horizontal nylon rows most people mean when they say MOLLE. A standard pouch usually has one, two or four vertical fixing straps on the rear, often with press-stud tabs, tuck tabs, pull-through retainers or polymer clips.
Inspect the webbing before loading it. Stitches should be intact, rows should not be stretched, and fasteners should close positively. This matters particularly with older surplus kit or pouches that have seen regular range, field or airsoft use. A damaged row may not fail immediately, but it can allow a pouch to shift under weight.
Choose the position before you start weaving. Consider what is inside the pouch, which hand you will use to reach it and whether it will interfere with a rucksack waist belt, vehicle seat, weapon sling or body armour. Heavy items such as full water bottles, ammunition, radios or tools are best kept close to the body and balanced across the load carriage system. Small first aid, navigation or utility pouches need to be reachable without looking.
How to attach MOLLE pouches with woven straps
The correct method is an alternating weave. Each fixing strap passes through a row of webbing on the carrier, then through a row on the pouch, repeating all the way down. This creates a firm interlock that stops the pouch bouncing or pulling away from the platform.
1. Line up the top edge
Place the pouch against the chosen section of webbing. Feed each pouch strap through the first horizontal row on the platform, starting from the top. Keep the pouch level as you work. If it begins crooked, it will remain crooked once the straps are tightened.
On a pouch with two straps, work both at the same time, one row at a time. This keeps tension even and avoids ending up with one side lower than the other.
2. Weave back through the pouch
Bring each strap back through the first available horizontal webbing row on the rear of the pouch. Pull it through firmly, but do not drag the nylon so hard that you crease or abrade it. The pouch should now sit closer to the platform.
Feed the strap through the next row on the carrier, then back through the next row on the pouch. Continue this carrier-pouch-carrier-pouch pattern until you reach the bottom. The strap should never skip several rows on either side. Skipping rows is the common reason a fitted pouch rocks from side to side.
3. Secure the strap end
Once the strap reaches the bottom, secure it using its intended closure. A press-stud tab should fold behind the final webbing row and snap shut. A tuck tab should be pushed behind a horizontal row so it cannot pull free. If the pouch uses a stiffened polymer fitting, follow the same alternating route where its design allows, then lock the end into place.
Give each strap a firm pull. It should be tensioned with no loose loops, but the fastener should not be under so much strain that it is difficult to open for adjustment.
4. Test it under realistic load
Put the intended contents in the pouch and close it fully. Hold the carrier or belt securely, then pull the pouch in every direction. A correctly fitted pouch may flex with the webbing, but it should not slide, swing or lift away at the lower corners.
Walk, kneel, sit and shoulder any pack or sling you normally use with that equipment. This is where a good arrangement proves itself. A pouch can feel fine on a flat workbench and become awkward as soon as it meets a hip belt or the side of a vehicle seat.
Avoid the shortcut attachment method
It is tempting to run a strap through the top row of the platform and fasten it at the bottom without weaving back through the pouch. It is quicker, but it leaves a vertical gap behind the pouch. Under load, the pouch will sag, snag and place unnecessary stress on the top webbing.
The same applies to attaching only one strap on a two-strap pouch. Even a light utility pouch will twist over time. Use every attachment strap supplied unless the manufacturer specifically states otherwise.
Clips, speed clips and quick-release fittings can be useful when you need to move a pouch between loadouts. They are generally faster to fit than traditional woven straps, but can add bulk and may create pressure points against the body. For low-profile belt kit and pouches that carry heavier equipment, a conventional woven attachment is usually the more secure option.
Set up pouches for the job, not just the available space
MOLLE makes it easy to add capacity, which is also its weakness. Filling every webbing row creates a bulky, heavy setup that is harder to use in confined spaces and less comfortable over distance. Leave room for adjustment, access and airflow where appropriate.
On a belt, keep the front clear enough to sit, kneel and work comfortably. Place frequently used items where your support hand can reach them, while keeping hard objects away from areas that press into your hips. On a plate carrier or chest rig, avoid building a deep front profile if you expect to work prone. Slim admin, map or magazine pouches are often more practical than a large general-purpose pouch in that position.
For daysacks and Bergen-style packs, keep dense weight high and close to the back. Side-mounted pouches should be matched where possible so the pack does not pull to one side. If you are carrying water, remember that a full bottle changes the balance far more than an empty pouch suggests.
Common MOLLE fitting problems
If the pouch moves, remove it and check the weave. In most cases, one of the straps has been passed through carrier rows only, or has missed a pouch row. Refit it from the top rather than trying to correct a single section halfway down.
If the straps are too short to reach the final closure, check whether the pouch is mounted across more rows than its design allows. Some platforms use non-standard spacing, thick padded panels or angled webbing that can reduce usable length. A compatible adapter or a different pouch position may be the better answer than forcing the fastener closed.
If press studs repeatedly pop open, inspect them for grit, wear or deformation. Clean them, ensure the strap is not twisted and confirm the pouch is not overloaded. A loose retention strap is not something to ignore on field kit, particularly where the pouch holds medical equipment, communications gear or essential sustainment items.
A final check before heading out
Once your load carriage is set, make one last check with it worn as intended. Confirm every pouch is tight, every closure is accessible and nothing fouls your movement or other equipment. A properly fitted MOLLE pouch becomes part of the platform, not an item hanging from it - exactly what dependable field kit should do.